May 31, 2015

A Little Down Time...

A view from our courtyard
I didn't spend much time in the studio over the weekend.
 
Handsome and I attended a graduation party, and otherwise
spent more time outside than in. The weather was beautiful.
Anyone who knows me well, knows that I'd rather spend my time with nature
over "city time" any day. After the drive we took to pick up my Destiny on Friday,
 I needed some time away from traffic and crowds. I regenerate when I'm outdoors.
Our beautiful yellow hibiscus blossoms
We walked to our neighbor's home for their son's graduation party, and we 
enjoyed catching up with other friends who were also invited. We relaxed
with the pups in the pool at home, and we did our weekend yard work. We got
the yard all cleaned up just in time for the evening rain that we really need.

I have studio projects and appointments in town scheduled this week, and
this weekend was just what I needed to be ready for whatever comes next.
DonnaAcornSignature

May 30, 2015

Sunday Scripture...

Image courtesy of Abby at Little Birdie Blessings
DonnaAcornSignature

May 29, 2015

Pinch Me...

She's here!!!
I finally left the studio after midnight last night, because all I wanted to do was play with my new machine.
Yesterday morning, my sewing cabinet was empty and waiting for her arrival.
By dinner time, my Destiny was unpacked, unwrapped and had taken her place front and center in the studio. I could immediately tell that there would be a learning curve so that I could take advantage of all the new features, and I was anxious to get started.
Babylock has done it again. This machine is a combination of all the best of both the Ellisimo and the Crescendo. It's going to be a pleasure to use it. It's a larger, heavier and more heavy-duty machine, with some pretty fabulous new features.

I had a few things to calibrate before I could start sewing, so I did that right away. Then, I got out some scrap fabric and "took her for a spin". Oh, goodness. This is going to be lots of fun! Pinch me, please. I can't believe she's mine! (Thank you, Handsome.)
The last few photos were taken close to midnight. Even with the artificial light, she's a pretty machine, and when I sewed a bit, she just purred. I'm going to get my weekend chores out of the way early so that I can get to know her better today.

I hope all of you enjoy your weekend. I'm certain I'm going to have a great time here!
DonnaAcornSignature

May 28, 2015

Today's The Day...

Block Five is completely finished now. The last thing I did was a tiny Colonial knot to create the duck's eye.
This is what the pattern for Block Six looks like. Rather than make a little brown owl, mine will be shades of gray...only two or three. I've pulled all the wools and threads, but I haven't cut anything out yet. I'll be a little side-tracked for the weekend.
I'm going to pick up my new Babylock Destiny this afternoon. Miss Ellie is on her way to her new home in Colorado, and the Crescendo will be moving in with one of my guild friends. Anyway, I'm going to be spending time getting to know Destiny this weekend, so my handwork will have to wait for now.

My sewing table is cleared off and waiting for me to bring her home. I'll take pictures to share with you tomorrow. 
Happy Friday, y'all! 
DonnaAcornSignature

May 27, 2015

I Almost Made It...

I played with the gals at Nifty 50s yesterday morning, and then ran errands until mid-afternoon. So, right after dinner, I headed back to the studio, intending to complete Block Five.
I almost made it. I stopped stitching at midnight with only two blossoms to go. 
  I did stitch the circle above the lavender-colored blossom on the left side of the
wagon, but forgot to photograph it after it was done. I'll finish this block today.

I've already set my sights on Block Six. It's the sweetest little owl you ever did see!
DonnaAcornSignature

May 26, 2015

Wool Applique' Tutorial...

I completed Block Four of the Wooly Critters Sampler over the weekend. This one is my favorite (so far). I love the little seeds on the strawberries. (The berries look good enough to eat!) 
 
Just FYI, the finished block is sitting on top of another finished block. You're seeing shadowing showing through from the other block, not staining or discoloration on this one.
Next up is "Duck & Flower Wagon". (I'm doing them in the order they appear in the pattern.) One of my readers suggested that I show you how I prepare my blocks to stitch. I'm more than happy to oblige. 
WARNING: PHOTO HEAVY POST
My first step is to take the pattern and decide which wool fabric colors I'll use in the design. After I choose the wools, I decide which threads will coordinate or accent the wools. In this case, I'll be using colors in Sulky #12 and Valdani #12 threads for my design (same threads as I used in the other blocks)
My next step is to grab my Heat'nBond Lite so I can trace the design elements.
Heat'nBond Lite is two-sided fusible. It has exposed fusible on one side and paper covering the fusible on the other side. I trace my designs onto the paper side as shown in the photo.
 
Once all the elements are traced, it was time to match the pieces up to their wools.
I decided to start with the duck. I have three different hand-dyed wools that I chose for the duck. I wanted the wing lighter than the body (as it appears in the pattern photo) so I fussy cut the lightest color from the different color sections.  Then I found the body section and different oranges for the feet and bill.
I like to cut out my fusible pieces first. I think I waste less wool this way. Once I cut out the fusible, I chose the section of the fabric I wanted, and fused the duck's body pattern piece to the wool. Don't iron back and forth. Just apply pressure on the fusible until it's firmly adhered to the wool. Let cool.
I usually fuse all the pieces first, but because I was using certain sections of the fabric, I decided to cut out each piece first. Then I cut the next piece until they were all cut out.
I laid them out as I cut them to make sure I was happy with my colors and placements. Not bad!
Here, all the pieces were cut out for this block, except the blue flower and right wheel centers. I cut those last two pieces out later. At this point, the paper is still on the backs of every piece of the design. Don't remove the paper yet.
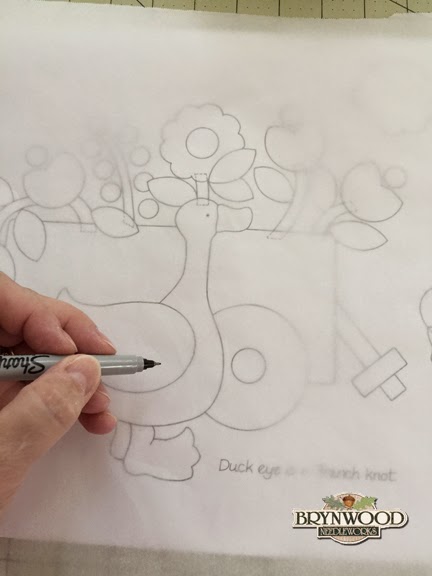
I had to make my guide for final placement of the components on the fabric. For this step, I prefer to use parchment paper. It's easy to see through for tracing and for placing the wool pieces I've already cut out for the design. I use a Sharpie™ marker.
My block background fabric has been cut larger than the final measurement for my finished blocks. Fold it in half twice to find the center of the fabric for design placement.
I also measured the design so that I could find the center of the pattern. Now I was ready to match up the center marks for the next step.
I use a blocker board (that I can pin into) as my placement board because I can pin the pattern to it, and later iron my pieces in place without having to move them to the ironing board. 
 
Match up the center of the design on the parchment paper to the center of the fabric and pin the top of the pattern through the block fabric and onto the blocker board to keep them from shifting.
I started with the fabric for my wagon. Removing the paper backing from the Heat'nBond fusible, I  placed the wagon to match up with the pattern. This is a process of flipping up the parchment, putting your pattern piece on the ground fabric and then dropping the parchment to make sure the piece aligns with the drawing. Adjust the wool piece until its in the right place. 
 
Before pressing the piece in place, I first placed any other wool pieces that needed to be under the edge of the main piece (like the flower stems or the wagon handle in this case). Once those pieces are in place, press sections of the wool down until they're fused to the ground fabric. I use steam to make sure the pieces are properly adhered.

If you look at the drawing, any piece with dotted lines means that it goes under the fabric where it's placed. See the stems for the flowers on the right side of the drawing? Both ends of each stem will go under the fabric for the blossom and the wagon. You can press the stems down once you've tucked them under the wagon. The blossom will lie on top of the stem when you get to that step. 
 
It's the same for the flower stem that goes under the duck's head and the blue flower above the duck. There are other places in this pattern, which I'm sure you can see if you look at my pattern template. After a while, you get good at seeing where parts have to be tucked under prior to pressing, and what can wait until later.
All the pieces (except the wheel and blue flower centers) are placed in this picture.
In this picture, they're all fused to the background (block) fabric and ready to be stitched according to the pattern instructions. Most of the stitching is done using blanket stitch. 
 
I'll probably add more decorative stitching to each of the blocks when they're all finished, but for now, I'm just following the pattern instructions to get them stitched down.
Four blocks are finished, and now, Number Five is ready to be stitched down. I took it with me to Paneras last night and worked on it. I already have the wagon, wheels and handle stitched down after two hours visiting with the girls. (There was actually more visiting than stitching.)

Today I'll be at Nifty 50s with the girls, so I'll finish this block today. Having finished four blocks already, I'm one-third of the way through the blocks. I'll be heading toward "half" by the time my duck block is finished.

I hope this took some of the mystery out of this project. It's actually quite simple and fun. If you have any questions, just let me know and (if you have a return email) I'll personally answer you. If you don't have a return email, I'll reply in a future Wooly Critters Sampler post.
DonnaAcornSignature

May 25, 2015

Tuesdays With Tag - I'm Still In Charge...

Hi, Everybody!
Thanks for comin' back to visit me again today.

I'm sure you're lookin' for an update on our newest family member.
Don't worry. I won't let you down. 
Let me tell you all about "Flyin' Teeth" (as I've started callin' her). 
She likes to sit pretty when she knows we're gonna talk about her.
Actin' all prim and proper and stuff, but I know better.
This is the kinda stuff I have to put up with. One minute, I was sittin' next to
Dad, posin' nice for a picture. Next thing you know...What the heck?
Flyin' Teeth, came runnin' in to wreck my concentration. Just look at her!
How can so much cuteness hide a heart as black as her coat? Jeepers!
Sometimes the only break I get is when Mom or Dad put me behind the gate.
I have the whole studio wing to myself. I'd rather be sittin' next to Mom durin'
dinner, but anythin' is better than having that little beast chasin' me around non-stop.
"You better watch out Bella!!! If Dad sees you, you're gonna be in BIG trouble!"
"Yeah, I thought so. Sittin' there like you're supposed to be on the furniture!"

Don't worry. She didn't get hollered at (even if that was okay with me).
Mom snapped the picture for evidence and then made her get down.
 
I like it best when I'm out in the yard alone these days. Otherwise, there's goofin'
off like nobody's business. I can run circles around her, but she's gettin' bigger 
even as I write this post! I'd better work on my killer Ninja skills if I'm gonna stay
 ahead of her. She can't be wreckin' my image. I'm still Corgi In Charge, after all!

I'll see you again in seven! 'til then...
"Keep Your Nose To The Wind
and The Sunshine On Your Tail."

May 24, 2015

Memorial Day 2015...

As you enjoy your day off with family and friends, please take a moment to thank
America's servicemen and women who have served and are serving our country.

Don't forget to pray for those families whose members gave the ultimate sacrifice...the
last full measure of devotion. For those families, today is not an occasion to celebrate. 

Thank you for your service. Thank you for your sacrifice.

God Bless America
DonnaAcornSignature

May 23, 2015

Sunday Scripture...

from Faithofourmothers.ca
DonnaAcornSignature