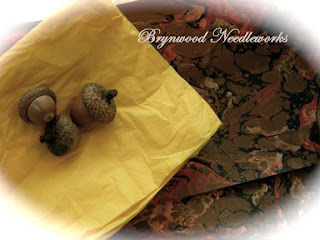
Another gift in the mail this week - this one from my sweet girlfriend, Denise. She sent me beautiful marbled craft paper - and Vermont acorns. She harvested them from her back yard last fall before the snow covered them. Thank you, Denise. You know I love the acorns and the paper is stunning! I'm waiting for a flash of inspiration on what to do with the paper. I'm sure going to have fun with them. Thank you, Denise!
 Blogger's "Pages" Feature
Many of you responded that you'd like me to tell you about the new "Pages" feature on Blogger's gadget menu. If you have any questions after this post, you can leave it in the comments section, or email me directly.
Believe me, I'm not particularly brave about adding something new to my blog. I always save my template before I do things like change colors, font or add code. I'm perhaps a little more comfortable with code because I've been an eBayer for over ten years, and in the "old days", if you wanted large or colored font, italics, etc. you had to enter them in html format. Now, just like here, you can accomplish that with simple button clicks. There's no need to save your template. You won't be messing with that. This is really as simple as writing a post and adding a gadget, which I'm sure you've already done.
So, here's what I did to add some new pages to my blog menu bar (located directly under my blog banner). Oh...I did the color block through another blog tutorial a while back. I'd have to go searching for those instructions, but I think I found the "Add a menu bar" tutorial on
All Blog Tools before Blogger made this new feature available. You won't have that color block unless you link to a tutorial for that. (Hint: I did a Google search: "Blogger Menu Bar" and found lots of entries to explore!)
To add your own "Page" through Blogger is a wonderful feature. You won't have to backdate the post and bury it as you've done before. I usually open my blog in a second window on my desktop, so that when I'm ready to start transferring something into a Page, I can just cut and paste from one window to the other. It's just easier for me that way.
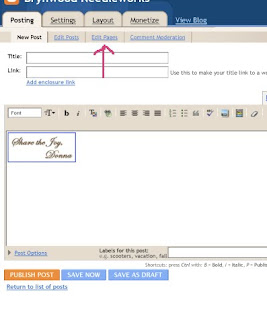
NOTE: You may want to open a second window on your desktop now and bring up your blog so that you can click along with what I've written below for clarity. Just think of it as a test page, which you can easily delete later.So, sign into your blog and then go to the same place you'd go to write a new post. There you'll see tabs for "New Post", "Edit Post", and "
Edit Pages". That's the one you want to click on. Once there, you'll click on "New Page". Once you click on it, you'll write your page title and add your content.

In my case, I wanted to make a special page just for all the blog giveaways that I post for you. I wrote a short message and then went back to the other window I had opened for my blog and clicked on the wrench to edit the first blog giveaway gadget. I pulled the giveaway photo from that giveaway onto my desktop so I could capture it for the new page. (Which I then did.) I want to place the link back to the giveaway under the photo (because they wouldn't let me link it by clicking
on the photo), so I clicked under the photo first and then clicked the "link" icon. I copied the url from the other window, and then pasted it into the link on the new page. You will see that the url appears in the first box as well as the second. You can remove the url from the first box and type in the name of the blog (which I did). Now when your followers click on that blog title, it will take them to the giveaway.
OK, those are
trees, and you still want
forest. Sorry. So, type whatever you want into the page content and then click "save".
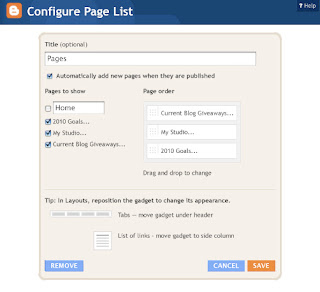
Now, if you go to your blog, you will see a gadget for "Pages", probably located in your sidebar. Click on its wrench (remember you're still signed in), and you'll see something that looks like this: (click on it to enlarge the image and check it out. I'll wait...tick...tock...tick...tock...)

Because I already had a "Home" link on my original menu bar, I unclicked that here, so that I wouldn't have two. You
will want to check the "Home" link so you have one in your menu bar. It's already preloaded with your Blogspot url.
You'll see that you can choose where you want your Pages gadget to appear. In my case, I wanted it up top, so I went to "Customize" (you've done that before), and dragged it to where I wanted it to go (just like you'd do with your other gadgets). Now you have the start of your Pages! Go ahead...add more! No dates appear at the top, no comments will appear on your link. You're going to love this new feature. Let's see...hmmm... what else can I move?
Remember, you can contact me if you have any other questions about this. I'm no genius, but I'll to help you any way I can.

 Well, the big day is finally here! I really wish I could have given a little something to everyone who entered, but rest assured, I'll have another cool giveaway soon! So, without further delay, I'd like to announce all the winners of my Alice in Wonderland-themed First Blog Birthday Celebration...
 The winner of Alice's Necklace is
 The THREE Winners of Alice's Teacup Pincushions are:
 There are SIX Winners of Alice's Bookmarks.
 Last, but certainly not least,
 I've posted my first entry on Button Floozies! You can read it here.
 I've posted my first entry on Button Floozies! You can read it here.


