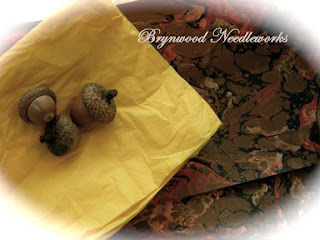
 Another gift in the mail this week - this one from my sweet girlfriend, Denise. She sent me beautiful marbled craft paper - and Vermont acorns. She harvested them from her back yard last fall before the snow covered them. Thank you, Denise. You know I love the acorns and the paper is stunning! I'm waiting for a flash of inspiration on what to do with the paper. I'm sure going to have fun with them. Thank you, Denise!
Many of you responded that you'd like me to tell you about the new "Pages" feature on Blogger's gadget menu. If you have any questions after this post, you can leave it in the comments section, or email me directly.
Believe me, I'm not particularly brave about adding something new to my blog. I always save my template before I do things like change colors, font or add code. I'm perhaps a little more comfortable with code because I've been an eBayer for over ten years, and in the "old days", if you wanted large or colored font, italics, etc. you had to enter them in html format. Now, just like here, you can accomplish that with simple button clicks. There's no need to save your template. You won't be messing with that. This is really as simple as writing a post and adding a gadget, which I'm sure you've already done.
So, here's what I did to add some new pages to my blog menu bar (located directly under my blog banner). Oh...I did the color block through another blog tutorial a while back. I'd have to go searching for those instructions, but I think I found the "Add a menu bar" tutorial on All Blog Tools before Blogger made this new feature available. You won't have that color block unless you link to a tutorial for that. (Hint: I did a Google search: "Blogger Menu Bar" and found lots of entries to explore!)
To add your own "Page" through Blogger is a wonderful feature. You won't have to backdate the post and bury it as you've done before. I usually open my blog in a second window on my desktop, so that when I'm ready to start transferring something into a Page, I can just cut and paste from one window to the other. It's just easier for me that way.
NOTE: You may want to open a second window on your desktop now and bring up your blog so that you can click along with what I've written below for clarity. Just think of it as a test page, which you can easily delete later.
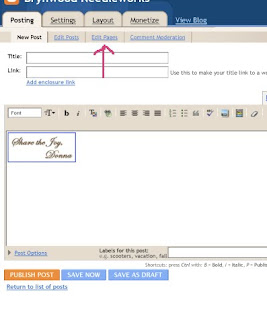
So, sign into your blog and then go to the same place you'd go to write a new post. There you'll see tabs for "New Post", "Edit Post", and "Edit Pages". That's the one you want to click on. Once there, you'll click on "New Page". Once you click on it, you'll write your page title and add your content.
 In my case, I wanted to make a special page just for all the blog giveaways that I post for you. I wrote a short message and then went back to the other window I had opened for my blog and clicked on the wrench to edit the first blog giveaway gadget. I pulled the giveaway photo from that giveaway onto my desktop so I could capture it for the new page. (Which I then did.) I want to place the link back to the giveaway under the photo (because they wouldn't let me link it by clicking on the photo), so I clicked under the photo first and then clicked the "link" icon. I copied the url from the other window, and then pasted it into the link on the new page. You will see that the url appears in the first box as well as the second. You can remove the url from the first box and type in the name of the blog (which I did). Now when your followers click on that blog title, it will take them to the giveaway.
OK, those are trees, and you still want forest. Sorry. So, type whatever you want into the page content and then click "save".
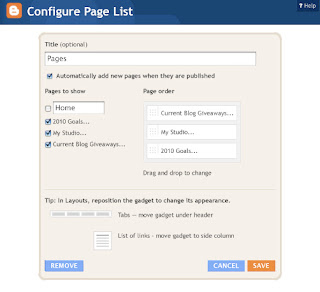
Now, if you go to your blog, you will see a gadget for "Pages", probably located in your sidebar. Click on its wrench (remember you're still signed in), and you'll see something that looks like this: (click on it to enlarge the image and check it out. I'll wait...tick...tock...tick...tock...)
 Because I already had a "Home" link on my original menu bar, I unclicked that here, so that I wouldn't have two. You will want to check the "Home" link so you have one in your menu bar. It's already preloaded with your Blogspot url.
You'll see that you can choose where you want your Pages gadget to appear. In my case, I wanted it up top, so I went to "Customize" (you've done that before), and dragged it to where I wanted it to go (just like you'd do with your other gadgets). Now you have the start of your Pages! Go ahead...add more! No dates appear at the top, no comments will appear on your link. You're going to love this new feature. Let's see...hmmm... what else can I move?
Remember, you can contact me if you have any other questions about this. I'm no genius, but I'll to help you any way I can.


wow..Donna thanks so much...I love this feature...you talked me right thru it too.....great job..
ReplyDeletelove those baby shoes,. and they have great acorns in Vermont...love those caps on them.
Ok I have a question....I have my lionk for my ETSY shop up ther ..how do I link it directily to my etsy page and not another new post page? that make sense...
ReplyDeleteyours goes right to your shoppe..thanks Donna
Hallo,
ReplyDeleteliebe Grüße aus Deutschland. Eine tolle Idee, wie du deinen Blog aufgeteilt hast.
Leider bin ich auf diesem Gebiet noch nicht so weit.
Kannst mich gerne mal besuchen, auch bei mir gibt es ein giveaway.
Liebe Grüße
Margit
Thanks so much. I really must try this for myself now that I have read all the way through your instructions. It all sounds so much easier than I thought it would be.
ReplyDeleteThanks Donna.
ReplyDeleteI'm going to come back to this post later (when I'm not balancing a laptop and a dog on my lap and a cup of coffee in my hand) and really go through the instructions.
Thanks for taking the time to help us out.
Jane
Good Morning,
ReplyDeleteGlad you liked your little pkg. This week I have more French Marble Paper to send you and it is more of a plum color with flecks of gold. This time I will send it flat. Have a great weekend!
Donna, your directions are soooo user friendly! I've got a new page for you to start...Blogger Directions!
ReplyDeleteThanks so much for sharing this with us. I'm so new to blogging and Blogger that I'm a bit frustrated with all the stuff I don't know how to do yet. I'm not a HTML code liker and try not to get mixed up with it, but with good directions I can manage. I only last night just learned how to get my pictures in different places besides the very beginning of my post!!! Duh!!! Any and all help with the basics and some cool stuff would be most welcome. Thanks again!
Doni
Donna
ReplyDeleteHow funny you did a post on this because I have been playing with this for the past few weeks...if only I had waited ...lol
Whats really funny is I wanted to do the seperate page for giveaways..bright minds think a like...lol
Enjoy your weekend
Maggie
Yea! I did it! What a sense of accomplishment! And I even made a button for my sidebar with some help too! Woohoo! A new thing learned today!
ReplyDeleteThanks Donna!
Thank you so much for sharing this blog tool. I might try it another day so I will come back to this. This weekend is already full up. Happy creating...
ReplyDeleteOh goodness! Thanks for posting that tutorial. I am fearful of making changes to my blog in case I lose something or make a mistake. I am sure this tutorial will make my life MUCH easier. Thank you again!!! Theresa
ReplyDeleteThank you for your information I won't get to play with it this evening, but I will and I let you know so you can check out what I did when it is complete. I have been having fun learning how to change colors and etc. I get a little braver each day, but I have to get my baby quilt finish so it will be hit and miss on the computer. Take care Your Missouri Friend
ReplyDeleteOh, neetoh,,I will have to try it.
ReplyDeleteThanks Donna!