Showing posts with label Humanitarian Dolls. Show all posts

December 9, 2015

A Day For Dollies...

Brynwood Needleworks - Donna and Jamie Making Dolls
My friend, Jamie and I spent most of our time at Nifty 50s yesterday, making dolls to go with Marcy's dresses. Marcy included doll fabric to match each dress, which she tucked into the dress pockets.

Jamie found a template for the doll faces on the internet and, after prepping the fabrics (which I'll explain below), ran them through her inkjet printer for us.
Brynwood Needleworks - Susie, Cutting Doll Hair
My friend, Susie helped by trimming the dolls' "hair" after we sewed the heads up. (She used to be a hairdresser, so this was her obvious calling!)
Brynwood Needleworks - Friends Admiring Dresses and Dolls
There was a lot of interest in what we were doing. I showed off dresses and then we'd elicit giggles each time we showed the finished doll to match the dress.

One group of ladies took pictures of some of the dresses and dolls. I think we may have inspired more volunteers to help in the future!
Brynwood Needleworks - Finished Dolls
Here are some of the finished dolls.
Brynwood Needleworks - More Dolls
Of course, all of them have different hairdos. Some are long, some are short, and some of spikey. All are adorable!
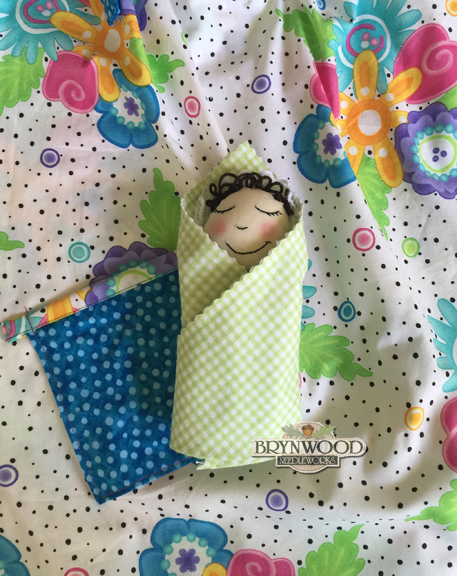
Brynwood Needleworks - Sleepy Face...Happy Face
Every doll has a happy side and a sleepy side on their head. The little girls only need to turn their dolls over to get the other expression.
Brynwood Needleworks - Doll Heads Printed On Fabric
Jamie printed out lots of faces onto different shades of brown and ivory fabric for our sewing day. These are just two of the fabrics she chose, but there were many different shades. Each doll had both faces, one on each side of their head.


Brynwood Needleworks - Doll Heads Printing Images
Here's a copy of the face templates in case you'd like to help with our effort. You could either make dolls themselves, fabric to donate to our project, or print faces onto fabric to send to make more dolls.

We also accept donations of fabric and trims for dresses and dolls, yarn for doll hair, or polyfill for stuffing the dolls. All donations are welcome. (You can send an email to me if you're interested in participating.)

Printing on Fabric Instructions
Start by ironing the fabric to the shiny side of freezer paper. Trim the fabric and paper to 8.5" x 11" (copier paper size) so it will run through your printer. Either run the fabric through your inkjet printer on the copy setting with this template on the scanner bed, or print from your computer (@ 100%).

Leave the faces on the paper until you're ready to sew. Remove from paper and cut around the heads on the lines. We sew the head piece to each body piece (see files on the "Dressed In Joy" page in the Brynwood menu bar at the top of my blog) before sewing the heads together.

Match up the necklines first (right sides of fabric together), and sandwich the yarn "hair" between the head pieces before you sew. Start at one side and sew all the way around the doll, catching the hair as you sew. Leave the bottom open for turning and stuffing.

After turning the doll right-side-out, stuff the head and body with polyfill. Pin the bottom closed and then use a straight or decorative stitch to sew it closed. After sewing it closed, I like to pink the bottom edge for a finish that won't fray. Done!

We'll be doing this again in a couple of weeks. We have more dresses and will have more faces to make dolls. I bet we have more dollmakers then, too!
DonnaAcornSignature

September 20, 2015

Making Faces...

Doll Created by Dressed In Hope
When we were in Orlando, members of our group took photos of the dolls that the "Dressed In Hope" group makes for older girls. We still want to make baby dolls for smaller children, but liked the idea of doing something different for older girls, too. This was one of their finished dolls.
Dressed In Hope Doll Faces
We also took photos of the doll faces they were making for their dolls. We liked these, but decided that we wanted to make our faces just a little different.
Brynwood Needleworks - Doll Face
Well, you'll never hear me bragging about my painting skills - unless I'm painting walls - so I was a little nervous about painting faces for little dolls. I surely didn't want to frighten any children with my dolls, so I painted a few before I was happy enough to ask our group for their feedback. 
"Do you think she looks scary?", I asked. The response was a generous, "Cute!" or "She's sweet", so I kept working on my first doll in the "Big Girl" design.
Brynwood Needleworks - Dressed In Joy Big Girl Doll
Here's my first Big Girl Dolly. Her "outfit" matches a dress I made in the same fabric. After she was completely assembled, I added yarn hair. 
I sewed the "part" in her hair on my sewing machine to hold all the yarn strands together, and then hand stitched the hair to the doll head on the part line. Once it was securely attached, I decided where her little pigtails would go and sewed the hair at that point, too. 

When I was all finished, I giggled. Although I know I have a long, long, LONG way to go before I'll call myself a "doll maker", I'm happy that a small child, who may never have seen a doll before, might love and play with those I make.
Brynwood Needleworks - Doll Faces
I painted four more faces that could dry overnight, so I'll be able to assemble a few more today. I decided that all their faces would be a little different, and each mouth begins as a small heart. When I pointed out my heart-shaped mouths to the other dressmakers in our group, some said they liked (and might use) the idea. (Yay!)

I'll share more dolls with you as I make them, along with the matching dresses I'm working on. You'll just have to wait a couple of days. Tag is up tomorrow, you know!
DonnaAcornSignature

September 13, 2015

Danice's Dresses and Dolls...

Brynwood Needleworks - Danice's Prayer Dolls
I received three more dresses from one of our dressmakers, Danice, last week. When I opened the box and took them out, I was surprised to find a sweet, little doll in each pocket. These are called Prayer Dolls on the Dress A Girl Around The World website.

Thank you, Danice for making these and sharing the link.
Brynwood Needleworks - Danice's Dresses and Prayer Dolls
I think they're absolutely adorable, and plan to make some myself. There isn't time to add them to all the dresses in this batch, as I'll be delivering those on Thursday, but I think these (and the Humanitarian Dolls) are so wonderful, that I would like to be able to add them to the next batch.
Perhaps you're not interested (or able) to make dresses for what will become an ongoing effort through Brynwood Needleworks, but you might like to try your hand at one style or another of the dolls. The links below will take you to the pattern information and instructions.
 
 
Please let me know if you'd like to participate by making these for our next deadline (in early 2016.) If you're not already a member of our Dressed in Joy FaceBook page, just request to be added so you can see the beautiful dresses and dolls being created, as well as photos from our work groups, and more.

This week is already off to a roaring start. I'll show you what I've been working on over the weekend on Wednesday. (I'm not finished with it yet, but should be by then!) 
 
What are you working on these days? I'd love to know!
DonnaAcornSignature

June 18, 2015

Humanitarian Dolls...

If you've followed me for any length of time, you're aware that I've frequently said that I can't make dolls. I tried years ago and considered it a miserable failure. Now, I'm thinking it was because I started out too "grand". Perhaps something a lot simpler would be more prudent?
I found the pattern for Humanitarian Dolls on the Dress A Girl Around The World™ site (HERE)  and thought, "What the heck? After all, it's for the children." I decided to try again, and guess what? I can make dolls! This doll with the curly hair was my very first attempt.
I decided to stitch the face, rather than paint or use a marker. I think it might be more durable than paint or ink. As directed, I grabbed a Q-tip and spread a little powder blush on her cheeks. I also added a bow for a little something extra. The hair is yarn, sewn to her head.

Her face is a little wonky and it's obvious that she's my first effort, but I love her, and I think some little girl might, too.
After I finished the first one, I thought, "I think I could do better. Perhaps I can fine-tune some of my rough parts."

The second baby doll was much better. First, I used a decorative stitch on the edge to sew the two halves of the triangle together, rather than a basic straight stitch.
I sewed a little collar (same fabric as the dress) onto the "neckline" of the baby, and I stitched the lace (to mimic a bonnet) to the head prior to stitching it down. I also overlapped the head and the body just a bit to give it more stability. I'm very satisfied with the resulting Humanitarian Doll.
It's not a very big dolly for a little girl, but it's the perfect size to put into the pocket of her dress! Now, she'll be able to keep it close.

I chose a bright, colorful fabric for the dress and the pattern worked up quickly. Combined with the dolly (equally quick), I think it will make some little girl very happy.
The Dress A Girl Around The World™ labels arrived from Tucson yesterday, too. I have them available to send out to the participants of our group who prefer to sew them onto their own dresses. Otherwise, they're here so we can add them as the dresses arrive.
I'll be putting labels on my pockets from now on, but the label for this dress will go on the front near the hemline. All in all, it was a productive day. On to the next one.
DonnaAcornSignature