Showing posts with label organization. Show all posts

May 1, 2014

Decisions, Decisions...

Interior of my sewing organizer
I'm still sorting and putting things away, but I came across this project in the mix.
I taught this class a couple of weeks ago and I only have to attach and sew on the
binding and it will be finished. These are all the fabrics I pulled for the organizer.
Organizer exterior
This is the exterior of the organizer, and I really like the fresh colors for the outside.
I only have to decide which fabric to use for the binding. I'm partial to the red.
What do you think?
If you're interested in the pattern for this organizer, you can find it in my Craftsy
 shop (here). Zippers, ties and pockets combine for a great little project. Don't
worry about installing a zipper. I've got a really simple solution that makes for an
easy install. You can also add ribbons and embroidery to further personalize yours.
 
Back to work for me. I really want to finish the studio and house "reclamation".
I'd love to be able to play over the weekend, so I have to concentrate today.
Have a great Friday!
DonnaAcornSignature

January 4, 2012

Dreaming of a Spacious Haven...

One of my blog girlfriends recently commented on my "always organized" studio space. I giggled when I read that because many times it's far from "calm" in there. We always want to put our best face forward on our blogs, so I rarely show you the "real" images in my creative cave.

I cleaned out the closet in the bathroom next to the studio two days ago. It's the "overflow" space that I use for storing what I can no longer fit into the studio. I really needed to see what was in there, having not emptied it in quite a while. That was my major project for Tuesday.
I kept pulling things out of the closet and sorting through them and by the time I was finished, my studio was utter chaos! Just look at this mess! I took two bags of yarn and two boxes of knitting magazines to Paneras on Tuesday night to give away. I shared my stash, and more than a few women went home really happy.

It took me all day yesterday, but by the time I needed to start dinner, I finally had it whipped back into some semblance of order. (That's the first photograph in this post.)

After living in the Flying Cloud last summer, I've felt that there was too much stuff in my studio. I'm going to make it my mission to continue to clear the clutter - little by little (we don't want to do anything drastic, after all) until my room is returned to a spacious haven that will better foster creativity. 

So, don't think that it's always tidy and clean here at Brynwood. I'm just like the rest of you. Sometimes "messy" just happens.
 In case you missed the post, I'm hosting a quiltalong. If you click here, you can learn more about it...and if you click on the "Farmer's Wife Sampler Quilt QAL" on the menu bar at the top of my blog, you can see who else is participating. We'll be starting February 1st, so there's still time to join the fun!

July 30, 2009

Organization In The Studio...

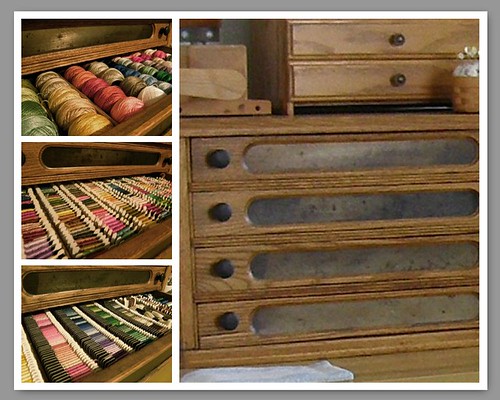
I'm going to try really hard not to get carried away with this mosaic feature, but I couldn't resist. Doesn't it enhance the clean look of a post? Well, speaking of clean (I know, nice segue right?), I just wanted to show you some of the ways that I try to control clutter in my studio.

First, I want what I use to be beautiful and different. I have way too much plastic behind those cupboard doors, so I'm more conscientious about what's out in the open. Things I love to look at, along with things that are functional. My oak thread cabinet is one of those things that is both.

You can see from the mosaic that there are four drawers in the cabinet. The top drawer is full of needles in packages, and miscellany that looks like a kitchen junk drawer. You know, the one where you can find everything, but you don't want to show your friends how messy it looks?
The other drawers hold my silk threads, perle cotons and DMC© and Anchor© cotton flosses. We're not going to chat about my Type A personality, but to answer any questions...Yes, my flosses are in numeric order. 'Nuf said about that.

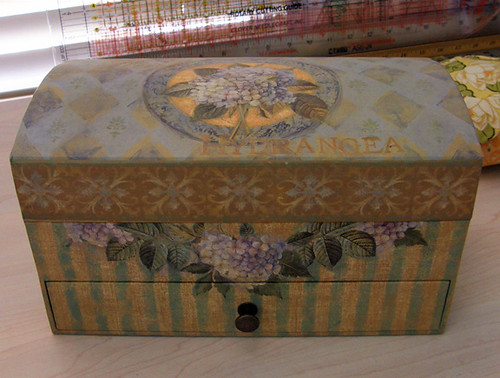
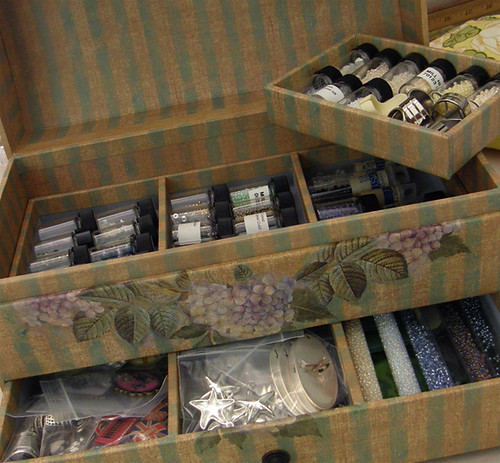
Then yesterday, I remembered that I have this beautiful jewelry chest sitting practically empty in the back of my closet and it occurred to me that it would be perfect for my little glass bead bottles filled with my special beads and newest charms and cabachons. So, of course I got right after it and removed one of those ugly (but highly functional) plastic organizers from my work area.

Don't you love the vintage, stripey, hydrangea beauty of it? I have it sitting on top of my work table now - at least for the time being - so that I can enjoy looking at it. What was I thinking when I sentenced it to the back of my closet? I must have been confused. I admit, some days are just like that.

Oh, before I run, I want to remind you that there are only SEVEN more days until my 100th Post Giveaway signup and giveaway gifts are announced. Hope you'll check back so you can enter the giveaway, too!
JoySignatureBROWNSM

June 25, 2009

Something New In The Studio...

You've been dying to see it, right? Wait no longer. Here's my new studio work table. It's from Ikea and it's called the Varde. It's a perfect height at nearly 36", and has a solid birch tabletop. Oh, and did I mention my favorite feature? Twelve - count 'em twelve - glass front drawers on no-slam runners. I also appreciate the overhang that makes it possible for me to mount my work lamp, magnifier (sigh) and my yarn swift. It's truly an all-purpose work table!

If you don't already know...Ikea is a huge store filled with really nice, quality furniture at great prices. One catch, though. Their prices are low because you put their pieces together yourself. We can put their Poang chair and ottoman together in twenty two minutes flat, but this piece took considerably longer.

In fact about five hours longer. I did most of the assembly myself, but there was no way I had the confidence to drill through the drawer fronts to attach the pulls, or the strength to drill and screw the birch butcher block to the base. I asked Handsome for his skill and expertise (and heavy duty drill) when I got to those parts!

So, it's finished now and I spent the day sorting through stash and filling drawers. I love it and can't wait to start my next project!
JoySignatureBROWNSM