Showing posts with label Pattern. Show all posts

February 17, 2025

Playtime In The Studio...

I finally got in some playtime this past weekend. The weather was less than pleasant with nearly 6" of snow falling on the farmhouse Friday night and through Saturday. I thought it was finally over, but I woke up on Sunday to more of the white stuff coming down. Thank Heaven for Andy. Although I had no plans to go out at all, he made sure the drive was open just in case.

Instead, I ran a little laundry, watch the Harry Potter marathon on the television, and created a couple little animals for the shelf. The first one is this cute, little rabbit I named "Valentine" (pronounced Valenteen). He measures a mere 3" tall from his tail to the tip of his ears, and then I attached him to a small wooden spool. If you look closely at the image on the lower right, you can see his poofy cotton tail! I added my BW acorn charm and a carrot charm as well. I added some French General ribbon on top of the thread and called this little guy done.

I had so much fun that I modified the pattern and made another animal on Sunday. I've named this little dog "Spot". He's brown and white, with a red jacket and bow tie. He's only 2" tall from head to toe. I only propped him on the pearl cotton ball to take the photograph. I'll mount him on a spool with some charms, too, but the pup is finished.

I found the original pattern on a blog that hasn't posted for ages. I came across and printed the free pattern years ago and found it again while I was going through my wool pattern binder. The blog is Prairie Mouse and it's still live, so if you'd like to make your own spool animals, the rabbit pattern is HERE to download. Just click on the "Free Pattern" image in her sidebar, and it will automatically download to your computer or smart phone.

Not bad for two snow days, right? I know I'm going to make more. Probably a mouse, and I may even try an opossum! I don't have any grey felt right now, so I'll have to get some next time I'm near a Hobby Lobby - or Joann's, if the one in town is still open. (That's a sad subject for another time.) All I know is these are really fun to make, and perfect for "armchair stitching".

We're expecting bitter cold through mid-week. I'd like a word with Mother Nature. I'm ready for spring, but I know the farmers need the moisture that comes with the snow. We just don't need the dangerous polar vortex stuff that hit late Sunday afternoon. It's not safe for man nor beast. Which reminds me...I'm going to need to go out for more birdseed and suet. I'll do what I can to help the birds through this. If I knew where the opossums were, I'd be taking hay out for them, too. Perhaps they've found their way to the Compass Barn. I'll look when I go out this morning.

Stay warm, friends. The map looks like Handsome might even be on the edge of this in Florida! I'll be back tomorrow with more to share.

November 6, 2019

Completed Shop Hop Crossbody Bags...

Brynwood Needleworks - BW Shop Hop Crossbody Bags
 
I completed all of these Monday, with more on the cutting table yesterday. These are really a fun sew for me, and most of them will be going into my booth on the 24th. I'm planning more in some of my beautiful, colorful, cork fabrics.
 
**If you'd like to make your own, you can purchase my "Brynwood Shop Hop Crossbody Pattern"  HERE.

I'll be working on more of these today, before I turn my attention to a few of the Nocturne Traveler Bags. I think those will be the next style under my needle. Nothing (except time spent with my family and dear friends) makes me happier than playing in the studio.

What makes you happy? I'd love to know.

DonnaAcornSignature

July 24, 2015

Sometimes Things Aren't Black Or White...

 Sometimes, things are gray.
Such is the case with our November guild challenge.

Every year, Disconnected Piecers Quilt Guild holds a challenge for our members. This year, the challenge is to create something quilted using background fabric(s) that only contain shades of gray. 

We are allowed to use other colors in our project, but any fabric used in the background can only have gray or shades of gray in them. No colors, and nothing that doesn't read "gray".
This is only a sampling of the gray fabrics I have in my...ahem...inventory. I've had my project in mind since the challenge theme was decided. Now that November is inching ever closer, I need to turn my thinking in this direction. 

All the projects that members submit for this competition will also be displayed at our 2016 quilt show in February.

I can't wait to start sharing peeks as I work on it. When I'm finished, I may even share a pattern for what I'm making. I'm very excited about this idea I've conceived and am looking forward to the entire process. I hope you'll follow along as it becomes a reality.
DonnaAcornSignature

October 8, 2013

Not Too Shabby...

...for a Shabby Tote, that is.
I finished the model for my next class. Now, to write the pattern for it.
Sewn with sweet, floral fabric, vintage lace and button, a dreamy image
and a floral accent on the pocket, all merging to become one girly bag.

 It can be sewn with or without batting. Then, add a pocket inside
for your keys or cell phone and voila! Grab your tote and head off
to the nearest flea market, shop or event to show off your creation.
You know your friends will want one, too! They make great gifts.
I'm really excited to share my pattern and techniques with the 
students who sign up for this class.  It's going to be so much fun!
Just imagine them bringing all their own laces, buttons and trim
to class and then letting their imaginations run wild. Wheee!

Once the pattern is written, I'll also be able to share it with you
via Craftsy. I'll let you know when it's up on my shop site, so you
can play with your vintage stash, too! I'll also have little kits that
will include the outside fabric, and image of your choice with
coordinating vintage lace, just in case you'd like a little headstart.
I'll put those up in my Etsy shop. I guess I'd better write that pattern!

Today, I'll be teaching "Flutterby" at Crazy Quilters. 
There really is nothing quite so rewarding as the look on a student's
face when you can tell they've learned a technique you're teaching.
I'm going to be looking for that today.

I hope you have a creative day today, too.
Later, girlfriends!
DonnaAcornSignature

June 7, 2013

Paper Piecing...

 Don't you love shopping your stash? I sure do!

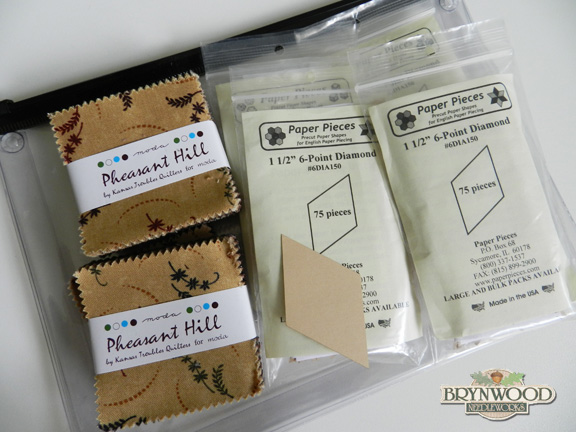
Last fall, I attended a local quilt show and found these sweet, little 2 1/2" Moda 
"mini charms". They're little versions of the 5 1/2" charm squares. I picked up 
four of them with no project in mind at all. The creamy Moda jelly roll 
behind them would be a great contrast so I pulled it to use in this
photograph. I also have another one that also cream-colored, but it has 
a variety of prints, which might work, too. I'll decide that later.
 You know from checking out my left sidebar that there is a long list
of blogs that I love to visit. One of them is well-known blogger, Jodi
Nelson of Pleasant Home. She sells these diamond-shaped templates
for paper piecing. The light went off when I saw them!
 They're the perfect size to use with my mini charms!
 I've put all the supplies I'll need into one of my vinyl zip bags, and I now
have a portable project! All I have to do is "grab and go" and work on them
as I have time. I really love  Jodi's project using these templates, and I may 
decide to do another small project using brighter colors. 
 (She has hexagon pieces, too!)

As it's already June, I need to start thinking about Christmas gifts this year. No 
procrastinating this year! I'm thinking table runners, pillows or wall hangings.
I'm still writing my pattern, so I can't show it to you yet. It's been a long time
since I did a pattern this involved, and I forgot just how intense it can be!
(I get tired, too - darn it - so I have to stop to rest. So frustrating!)
I'll continue to work on it through the weekend, and will debut it very soon.

Enjoy your weekend. I'm starting mine by joining the Coffee Club girls.
I've sure missed their smiling faces!
DonnaAcornSignature

November 4, 2009

Free Brynwood Scissors Bunny Tutorial...

I had fun in the studio yesterday afternoon working on a gift as part of an art swap. I decided to make my new gift into a free tutorial in case any of you would like to make your own. My pattern is for a sweet little Scissors Bunny.

I recently purchased the pretty wool fabric from Anne at Bunny Hill Designs. (Here's the link to her available wool selections.) Its perfect for this project. I chose a Flickr album format again for the tutorial.

This bunny measures about 4 1/2" tall, and would be perfect to identify your scissors at classes, or just to keep track of them at home. It also works as a little pincushion. Just click here to go to the tutorial. Please email photos to me if you make one. I'd love to see what yours looks like!

EDITED THURSDAY MORNING: I read your comments this morning and see that I've omitted some explanation in my tutorial, as well as perhaps needing another element for my scissors bunny. (You can see what I mean in my reply in the comments.) I've already changed the name of this post title and my tutorial to Scissors Bunny. I promise you a "redux" with corrections by the weekend. Your comments really do make a difference! xoxo
JoySignatureBROWNSM
***You can link to this tutorial, as well as other tutorials, patterns and video tutorials by looking down my left sidebar. Thanks!

July 2, 2009

Playing In The Studio Again...

It rained on and off all day. Perfect for watering in the newly laid sod now replacing the mess caused by the hog. Equally perfect for spending a day playing...I mean, working...no, I was right the first time...playing in the studio!

There is a reason why the first three letters in "fabric" are f-a-b. I got to play around with my fabulous fabrics. Eye candy to a seamstress. Just like Scrooge McDuck in his counting room. Second only to playing in my copious button collection, but that's a subject for another post.

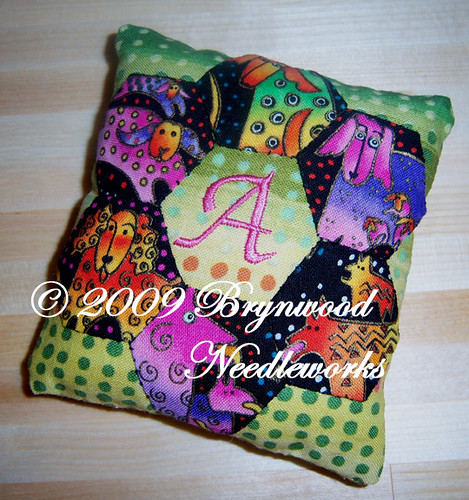
Of course I had two reasons for sorting through fabrics. One was that I've been designing, creating and photographing new pincushion patterns for my Brynwood Needleworks shop on Etsy . The other was that I'm a "swap angel".

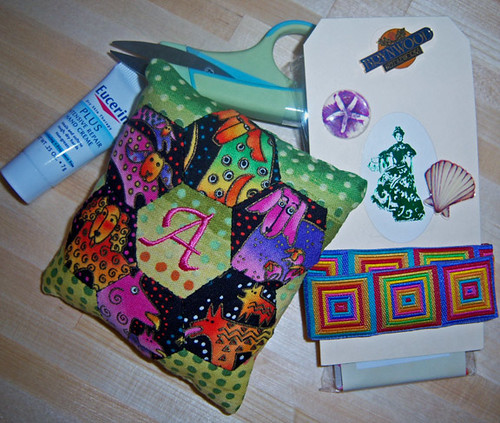
What's a "swap angel", you ask? Well, someone who participated in the last swap in which I was involved didn't receive her reciprocal swap package. (In her partner's defense, the package was coming from overseas. Need I say more?) At any rate, I am a volunteer angel when such things happen, so I was asked to be her angel this time and put a package of goodies together. As this was for a pincushion swap (woo hoo!), I decided to do something of my own design and then it would appear again in my Etsy shop! Clever, right?

When I was finished, I had created the pincushion, added some goodies and assembled her angel swap package! I put the postage on the box and it will go out in the morning mail. The bonus was that I ended my day with all the photographs I need to put the pattern together for the kit I'll be selling online!

You can check my Etsy shop by clicking on the hyperlink on Brynwood Needleworks above, or just scroll down the left sidebar until you see, "Shop With Me Online - Visit my Etsy Store". Oh, yes - and I managed to finished all the laundry, too. (Cue the iPod to "I am Woman".)
JoySignatureBROWNSM
Reminder: There is still time to sign up for the ATC swap. I'm still working on cards and would love to make a special one just for you! Just join my list of blog Followers, and then click on the "click here to email me" postcard on the left sidebar to let me know you'd like to participate!

May 26, 2009

A Fun Stash Buster Project...

This past weekend, I decided to take a little stroll through my rather extensive collection of yarn. I came across a large quantity of Idena Cotton Sport yarn in a lovely cream color and decided to make some new dish towels (Mum would call them "tea towels") for our kitchen. The store-bought varieties just don't seem to last very long anymore, so I thought I'd much rather have some of my own making instead.

You can see the result in the photo. After knitting up my own pattern, I added a sweet little crocheted flower, which I then affixed to the towel with a daisy-shaped button.

So, if you'd like to make a few of your own...and use up a little of your stash...I'm going to share my design with you. I think it's a little addictive. Once you make one, you'll want to make more!

Brynwood's Lazy Daisy Tea Towels
(Click on the Brynwood Tea Towel Photo below to download a pdf file of the pattern)

Approx. 250 yards of yarn per towel (You want them nice and big)
A Little scrap yarn in a contrasting color (for your flower - more if adding a contrasting stripe)
Size 6 knitting needles
Size H crochet hook
1 fancy button

Seed Stitch Pattern: Knit 1, Purl 1 across row. Next row, Purl the knits and knit the purls.

Cast on 64 stitches. Work in Seed Stitch for 6 rows. On subsequent rows, work the first and last 6 stitches in Seed Stitch. Knit all other stitches. (You'll end up with Garter Stitch on the area inside the Seed Stitch borders.) Continue in this manner until the towel measures approximately 21 inches from the beginning. Work 6 more rows in Seed Stitch (all the way across the towel), and then bind off all your stitches. Tuck in all your loose tails.

Flower: Using a size H crochet hook, chain 5 stitches. Join chain. Into the circle single crochet 1, double crochet 3, single crochet 1. Repeat five times, ending with a single chain. Tie off and tuck in loose tails.

Now, using a button that is bigger than the center of the flower:
Place the flower in your desired location, place the button in the center of the flower and, using perle cotton thread, sew the button to the towel. (You don't even have to sew the flower to the towel if your button is larger than the center of the flower!)

For a different look:
You can add three to five rows of your contrasting yarn color all the way across your towel when you're knitting it up. Just join in the desired location and stay in pattern using the new color. When you're ready, just switch back to the main color and finish your towel. (I knit six rows of seed stitch, then five rows of garter stitch in main color and then three rows in contrast color before changing back to the main color for the balance of the design.)

Your first towel is complete! Now, you can have a ball knitting new ones in your favorite colors - and go through some of that stash at the same time!
JoySignatureBROWNSM

By the way...Feel free to email this link to your friends to share the pattern! Everyone should make at least one special tea towel for their kitchen! All you have to do is click on the little envelope with the arrow (below), to forward it to a friend. You can click on the tea towels photo or go to my "My Completed Knit/Crochet Projects" album to see a larger photograph of the tea towels.